In the first part, I have explained why we need to understand a database trigger, when to use it and when to forget about it. In this blog post, let’s do some hands-on coding. Are you ready?
Understand the problem
For this short tutorial, we will illustrate how to create a trigger for a simplified database belonging to a dummy business named The Hoot Cookies.
- The database is used to track sales orders from customers who ordered cookies via the online shop.
- The business accepted credit sales for some customers with a 3-day credit term.
- During those 3 days, no further sales order can be placed for the same customer before the payment is settled.
- If no payment is received after 3 days from the order date, the customer’s Status will be changed to BLOCKED.
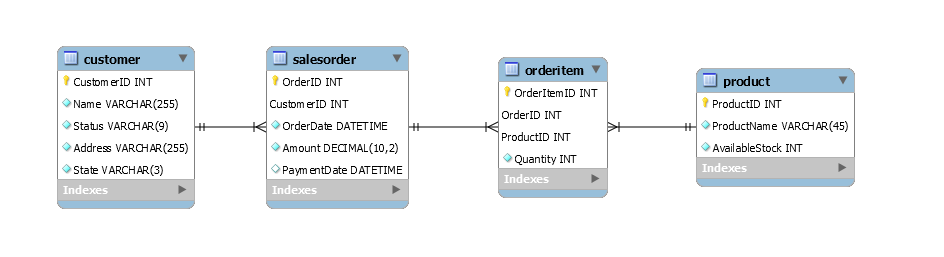
The database’s entity-relationship (ER) diagram is included below. All code shown in this post can be downloaded from my GitHub.
The trigger called TR_Check_Order will fire when a customer wishes to place an order and checks for the following conditions:
- The customer’s Status can’t be “BLOCKED”.
- The order’s Amount has to be at least $20
- The customer does not have any overdue invoice which has not been paid.
If the above check pass, then the INSERT statement is allowed to proceed.
Construct test cases
Below is a simplified list of test cases to illustrate different scenarios.
Table 1. Sample Test Cases
| ID | Test Case Description | INSERT allowed? | Error Message (if applicable) |
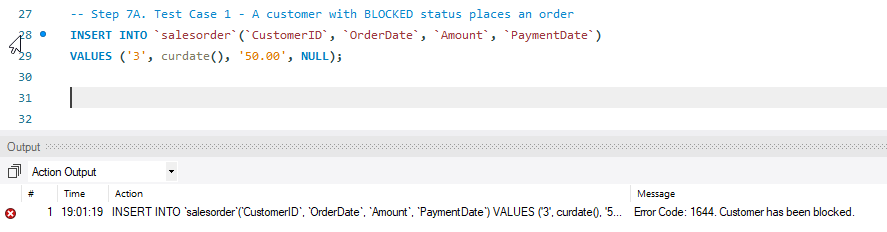
| 1 | A customer with BLOCKED status places an order. | No | Customer has been blocked. |
| 2 | The order’s Amount is less than $20. | No | This order does not meet the minimum order amount of $20. |
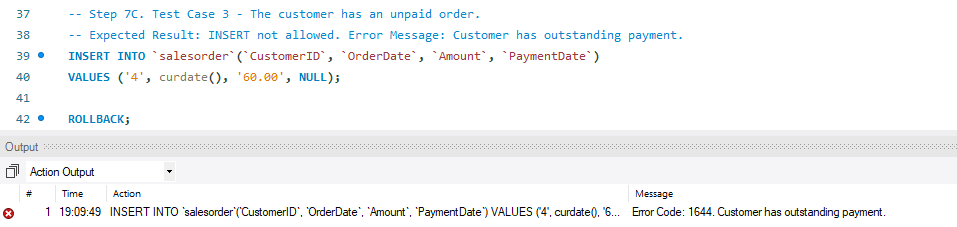
| 3 | The customer has an unpaid order. | No | Customer has outstanding payment. |
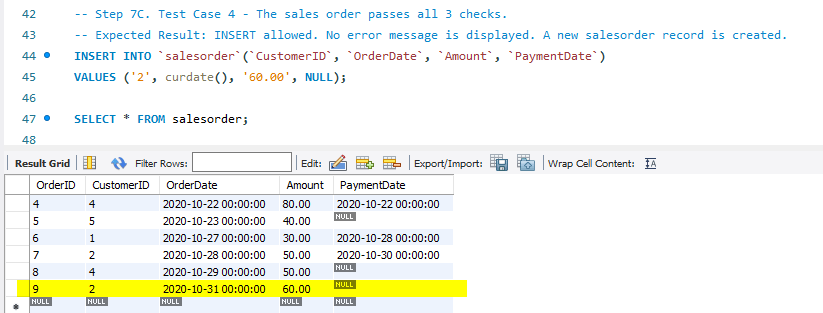
| 4 | All 3 pre-defined checks pass. | Yes |
Why do I include test cases before the code?
Based on my humble experience from previous projects, it’s really worth the efforts to discuss with business users to determine the test cases and the expected outputs BEFORE writing any line of code. Many assumptions, doubts and misunderstandings start rising to the surface when everyone talk about how they want the system to behave for acceptance. This will likely stir up some arguments and discussions. But still way better than rushing into writing hundreds of lines of codes without a clear understanding of what business users want the program to do.
Write the code
Below is the code I have written to create the trigger. I have also added a few numbers to indicate certain points that might be helpful to you.

1. USE statement
The USE statement helps to indicate which database is the default for subsequent statements until another USE statement is issued. Save us some typing when referring to a table name throughout the session.
You can still access tables in other databases in subsequent statements. However, the name of the other table (which is not the default) has to be mentioned together with the name of the column. For example
SELECT * FROM not_default_db.salesorder;2 & 7. DELIMITER statement
For number 2, it is a MUST to use the DELIMITER statement to redefine the delimiter temporarily so that we can pass the entire trigger code as ONE SINGLE STATEMENT instead of multiple statements separated by ;
For number 7, I thought it’s a good practice to return everything to the original state just in case we want to add more code after the trigger.
3. DROP TRIGGER
I include the DROP TRIGGER to allow multiple trials for the code while writing it. However, it is a dangerous statement that requires extreme care because you will delete a trigger having that name.
So here is my recommendation:
- Before coding, always check which existing triggers are currently defined for tables in the database by using the SHOW TRIGGERS statement.
- Choose a trigger name that noone is using and inform everyone in the team that you are using that trigger.
- Only DROP TRIGGER when you are 100% sure noone is impacted if the trigger is deleted.
4. Other possible types of triggers
BEFORE INSERT is only 1 out of 6 possible types of triggers. Other types of trigger include:
A trigger does not apply for any other statements such as DROP, TRUNCATE or CREATE
5. Tackle each check one by one
While writing the code, I find it easier to tackle each check one by one. Test it out, make sure I get the expected output before writing the next check. In doing so, I can avoid confusing myself with the behaviour of multiple if statements.
6. Remember to have enough ‘END IF’
Remember to count and check you have sufficient “END IF;” statements to match the above “IF”. I missed one while coding, and spent 15 minutes trying to figure out why I have a syntax error. Don’t be like me!!!
Perform testing with ROLLBACK
Imagine while editing a Word document, you make a mistake and want to click the Undo button (a.k.a Ctrl + Z). ROLLBACK statement in SQL does the same magic by aborting all the mistaken modifications you have made to the tables and return them to the original state, ready to resume your work immediately. How cool is that?
I have made use of ROLLBACK while testing the trigger. If you are interested, feel free to check out my GitHub. But below are the results for the 4 test cases that I have mentioned above. Just to show that the trigger works as expected.
Test Case 1 – A customer with BLOCKED status places an order.
Test Case 2 – The sales order’s Amount is less than $20.

Test Case 3 – The customer has an unpaid order.
Test Case 4 – All 3 pre-defined checks pass.
Wrapping Up
As mentioned in Part 1, triggers rarely exist in isolation. There could be multiple triggers currently defined for the same tables. If we aren’t careful, our new trigger might trigger one entire mess that is impossible to troubleshoot. Therefore, don’t stop at ensuring the trigger works as it is. Test and test and test whether it unexpectedly triggers other triggers or other triggers might fire it unwantedly too. With this, we have also marked the end of our 2-part journey to explore database triggers. Enjoy your weekend everybody. Ciao!
